
Greenhouse ventilation is the single biggest factor in whether your plants thrive or struggle inside a greenhouse.
If you've ever stepped into your greenhouse on what felt like a mild day and been hit by a wall of heat, you already know the central problem this guide solves. Greenhouses overheat fast, often faster than people expect, and the fix isn't as simple as "open a window." Getting ventilation and temperature control right means understanding a few basic principles and applying them consistently across the whole year, not just reacting to whichever season is causing trouble right now.This guide covers both halves of that job. You'll learn why greenhouses heat up the way they do, how to size ventilation for your specific structure, how shading and humidity fit into the picture, and how to handle the opposite problem: keeping enough warmth in during winter without shutting off the airflow your plants still need. By the end, you should be able to look at your own greenhouse and know whether it's set up correctly, and what to change if it isn't.
Why Greenhouses Overheat So Fast
Most people assume a greenhouse gets hot because the outside air is hot. That's only part of the story, and it's the smaller part. The real driver is solar heat gain: sunlight passes through the glazing (whether that's glass, polycarbonate, or plastic film), strikes the plants, soil, and hard surfaces inside, and converts to heat. That heat then radiates back outward as thermal energy, but the glazing material blocks most of it from escaping. According to the University of Georgia Cooperative Extension, common rigid glazing materials let less than 4% of that outgoing thermal radiation pass back through the greenhouse effect, working exactly as its name suggests.
This is exactly why greenhouse ventilation matters so much.
This is why a greenhouse can overheat on a mild, partly cloudy day just as easily as a scorching one, and why simply checking the outdoor forecast isn't a reliable way to predict what's happening inside. The trapped heat builds regardless of how warm it feels outside, which is exactly why active management not a "set it and forget it" structure is part of owning a greenhouse.
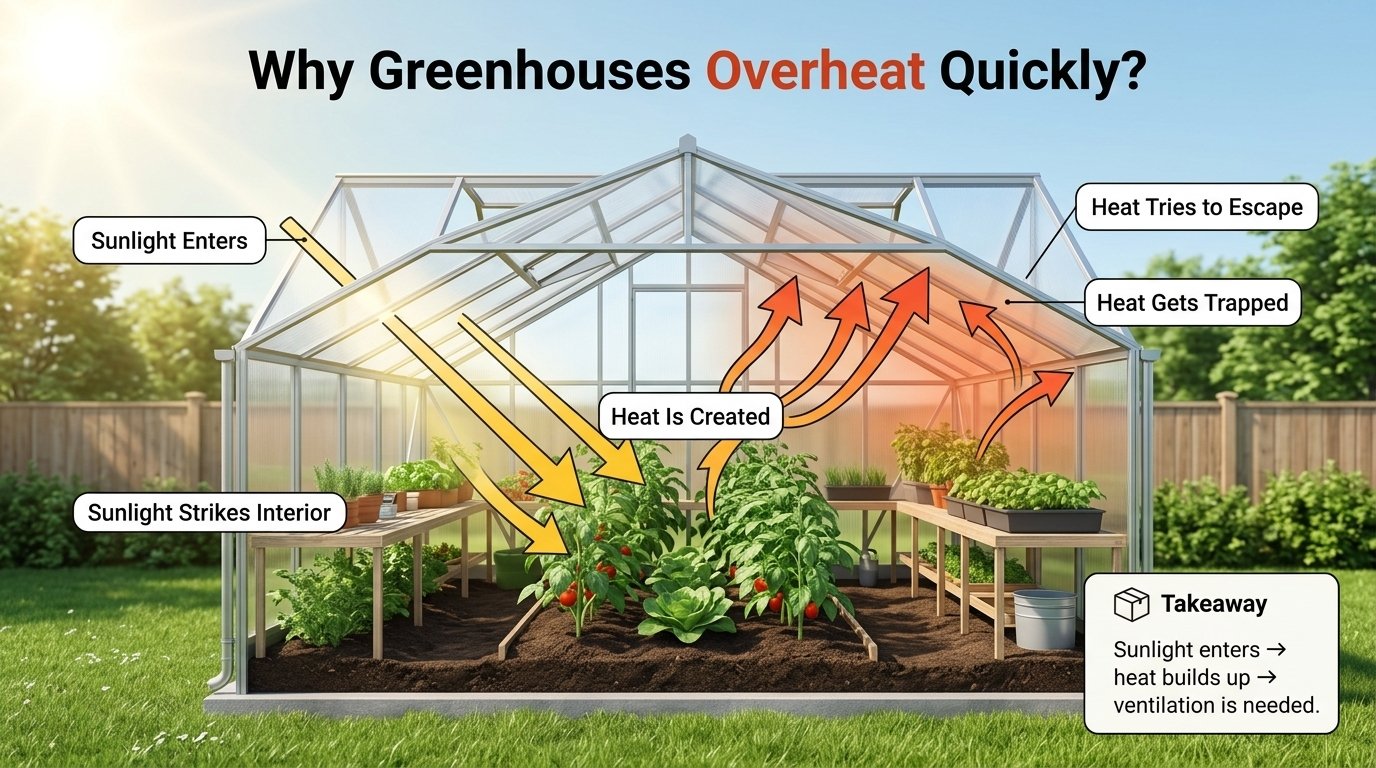
Quick Answer: A greenhouse gets hot because sunlight passes through the glazing and converts to heat inside, and that heat has a hard time escaping back out. Most home greenhouses need vents covering at least 15–20% of floor area, plus active fans for hot climates or larger structures, and should start venting once the inside temperature climbs into the mid-to-high 70s Fahrenheit.
Passive vs. Active Greenhouse Ventilation: What's the Difference?
Greenhouse ventilation falls into two categories, and most greenhouses end up using some combination of both.
Passive ventilation relies on natural airflow roof vents, side vents, louvers, and doors
to let hot air escape and cooler air enter, without any powered equipment. It's free to run, simple to maintain, and works well in mild climates or smaller structures, but it depends on wind and temperature differences to actually move air, which makes it less reliable during still, hot weather when you need it most.
Active ventilation uses powered equipment, typically exhaust fans, sometimes paired with a thermostat that turns them on automatically once temperatures cross a set threshold. It moves air far more reliably than passive vents alone, which matters in hot climates, larger greenhouses, or any setup where you can't count on a breeze. The trade-off is cost both the equipment itself and the ongoing electricity to run it.
Most home greenhouse owners get the best results from a combination: passive vents as the baseline, with an active fan added for the hottest stretches of the year or for structures larger than a small backyard kit.
How Much Ventilation Does Your Greenhouse Actually Need?
This is the question most guides skip, or answer with a formula that assumes a commercial operation. Here's a version scaled for an actual backyard greenhouse.
As a starting rule of thumb, aim for vent coverage equal to at least 15–20% of your greenhouse's floor area, split between an intake (typically low, such as side vents or a door) and an outtake (typically high, such as roof or ridge vents). This range is consistent with the Royal Horticultural Society's ridge-ventilation guidance, which recommends roughly one square meter of ridge vent per five square meters of floor area about the same 20% figure, just in metric terms and calibrated for UK greenhouse conditions rather than U.S. climates.
To put that in concrete terms: a small 6-by-8-foot greenhouse has 48 square feet of floor space, which means you're aiming for roughly 7 to 10 square feet of total vent opening, split between a low intake and a high outtake. That might look like one roof vent and one or two side vents or a screened door, depending on your specific kit.
If passive vents alone aren't keeping pace which is common in hot climates or during still summer weather an exhaust fan is the next step. According to the University of Massachusetts Amherst's Center for Agriculture, Food, and the Environment, total fan capacity should be roughly twice your greenhouse's floor area, measured in CFM (cubic feet per minute). For that same 48-square-foot greenhouse, that works out to roughly 96 CFM, well within the range of a single small exhaust fan.
If you're shopping for a fan, it's also worth checking its Ventilating Efficiency Ratio (VER) the amount of airflow it produces per watt of electricity used. UMass Amherst Extension considers a VER of 15 or higher (cubic feet per minute per watt) a reasonably efficient choice.
Common Mistake: Relying on roof vents alone. Without a low intake a door, side vent, or open lower vent hot air has nowhere to be replaced from, and the roof vent has very little to actually pull through. Ventilation only works well when air can come in low and exit high.
Checklist — Cooling Readiness (Before Summer Heat Arrives)
Vent coverage totals at least 15–20% of floor area, split between a low intake and a high outtake.
Every roof or high vent has a corresponding door, side vent, or low opening to draw air from.
A working thermometer (and ideally a hygrometer) is in place so you're not guessing.
If your climate runs hot or your greenhouse is larger than a small kit, an exhaust fan is installed and functional.
You know your target venting threshold (see below) and have a plan for hitting it consistently.
Research from the University of Connecticut Extension on tomato pollination notes that keeping greenhouse air from climbing much above 85°F helps protect tomato pollen viability. A reasonable starting point for home greenhouse owners is to begin venting once temperatures reach the mid-to-high 70s Fahrenheit, helping reduce the risk of excessive heat buildup before conditions become stressful.
Shading and Evaporative Cooling: Ventilation's Partners, Not Replacements
Ventilation alone often isn't enough on the hottest days, and this is where a common misunderstanding shows up: treating shading and ventilation as alternatives, when they're actually meant to work together.
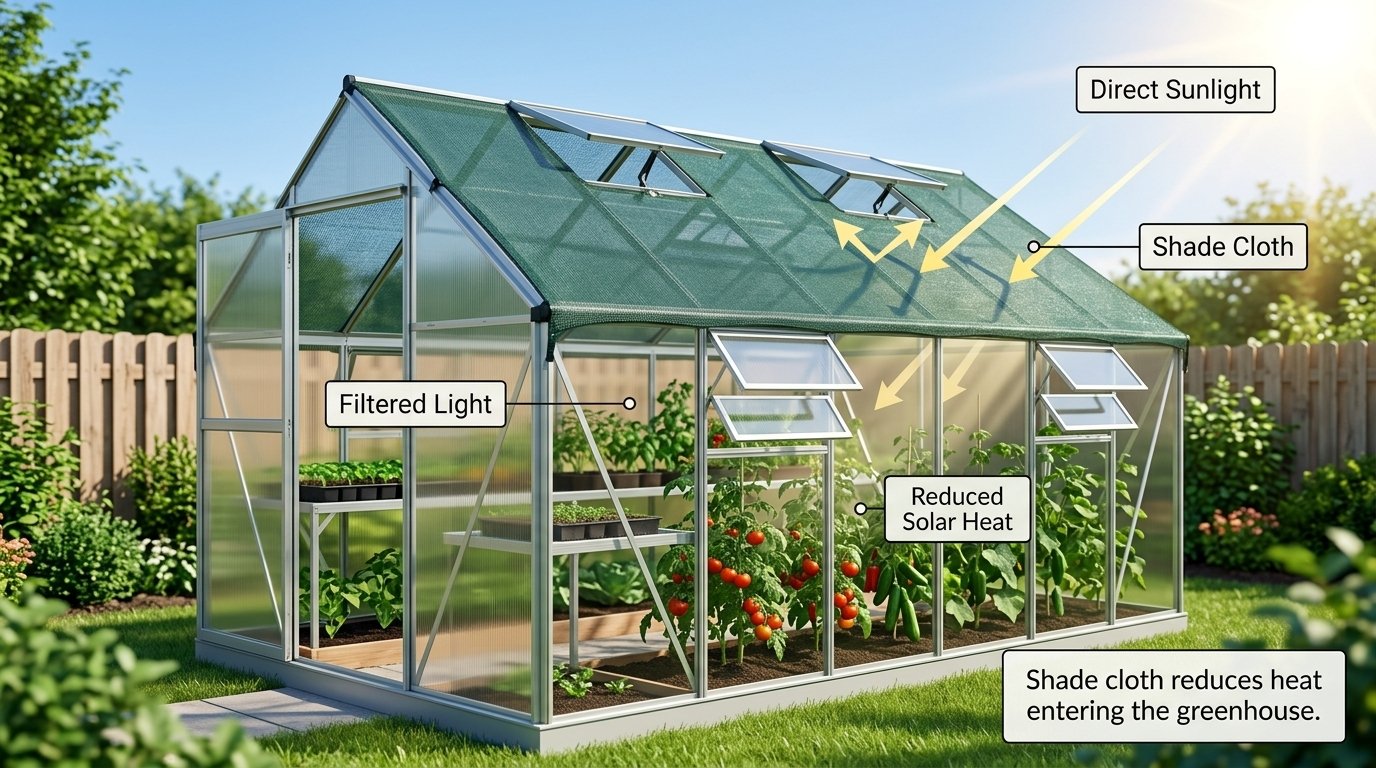
Shading reduces how much solar energy enters the greenhouse in the first place, which reduces the total heat load ventilation then has to remove. Options include shade cloth or netting (rated by the percentage of light blocked), external or internal blinds, and shading paint applied directly to the glazing. The Royal Horticultural Society notes that external shading is generally more effective than internal shading, since it blocks solar energy before it even reaches the glazing, though internal options are often easier to install and automate. Shading is typically most useful during the highest-sun months and should be removed or reduced once that period passes, since it also reduces light available to your plants.
Evaporative cooling uses the physical process of water absorbing heat as it evaporates, most simply achieved in a home greenhouse through "damping down" wetting the floor, benches, and other hard surfaces with a hose. The RHS recommends doing this at least three times a day during hot weather. It's a low-cost technique that cools the air and adds humidity at the same time, which is genuinely useful, but it works best alongside good airflow rather than in a sealed-up space, since evaporative cooling depends on that moisture actually being able to leave the greenhouse as vapour.
Used together vents and fans removing hot air, shading reducing how much heat enters to begin with, and evaporative cooling adding a low-cost supplemental cooling effect these three tools cover the vast majority of summer cooling situations a home greenhouse owner will encounter.
Humidity's Role in Temperature Control
Humidity and temperature are more connected than most people realize. Warm air holds more moisture than cool air, so as a greenhouse heats up during the day, relative humidity tends to drop unless you're actively adding moisture back in which is exactly what damping down accomplishes. At the same time, too much humidity, particularly overnight when temperatures fall and condensation forms, creates conditions that favour fungal disease.
The practical takeaway is that ventilation isn't just a cooling tool it's also your primary humidity management tool, since moving air prevents the still, damp conditions that both encourage disease and make a greenhouse feel uncomfortably muggy even when the temperature reading itself isn't extreme. If you're also managing pest and disease pressure in your greenhouse, this is worth connecting directly: proper airflow addresses both problems at once.
Winter: Retaining Heat Without Cutting Off Airflow
Most greenhouse ventilation guidance stops at summer cooling. "temperature control" cuts both ways. Once the growing season shifts and outside temperatures drop, your job flips from removing heat to keeping it in while still avoiding the still, damp, poorly ventilated conditions that invite disease.
Seal obvious drafts first. Check door seals, vent seals, and any gaps around the greenhouse frame. Small gaps let disproportionate amounts of heat escape relative to their size, and sealing them is typically the cheapest, highest-value winter step available.
Add insulation where it won't block too much light. Bubble wrap-style greenhouse insulation, applied to the inside of the glazing, is a common and effective option that trades a small amount of light transmission for a meaningful reduction in heat loss. It's most worth using on north-facing panels and roof sections where light loss matters less.
Use thermal mass to your advantage. Materials that absorb heat during the day and release it slowly overnight water-filled containers, stone, or concrete can meaningfully reduce how far the temperature drops after sunset, without any equipment or ongoing cost.
Add active heating if your climate requires it. Options range from small portable electric heaters for occasional cold snaps to larger heating systems for greenhouses used through a full winter. Whatever you use, follow the manufacturer's safety instructions closely heaters are one of the few genuine safety considerations in greenhouse management, and improper use is a real fire risk.
Keep some airflow, even in winter. It's tempting to seal a greenhouse completely once cold weather sets in, but doing so traps humidity and invites fungal problems. A brief midday vent opening on milder winter days, or a small permanent gap, helps prevent that buildup without giving away much heat.
Checklist — Heat-Retention Readiness (Before Winter Arrives)
Door and vent seals checked, with obvious drafts sealed.
Insulation added to north-facing or less-critical light areas, if used.
Thermal mass (water containers, stone) in place if you're relying on it.
Heater tested and functioning, if your climate requires supplemental heat, with manufacturer safety instructions on hand.
A plan for occasional airflow, even in cold weather, to prevent humidity buildup.
Automated Systems: Are They Worth It?
Automatic vent openers typically a wax-cylinder mechanism that expands with heat and physically pushes a vent open, requiring no electricity are a genuinely useful middle ground for passive ventilation. They open and close vents automatically as temperature changes, which matters if you can't be present to manually adjust things during the day. For a single vent on a small greenhouse, this is often a worthwhile, relatively low-cost upgrade.
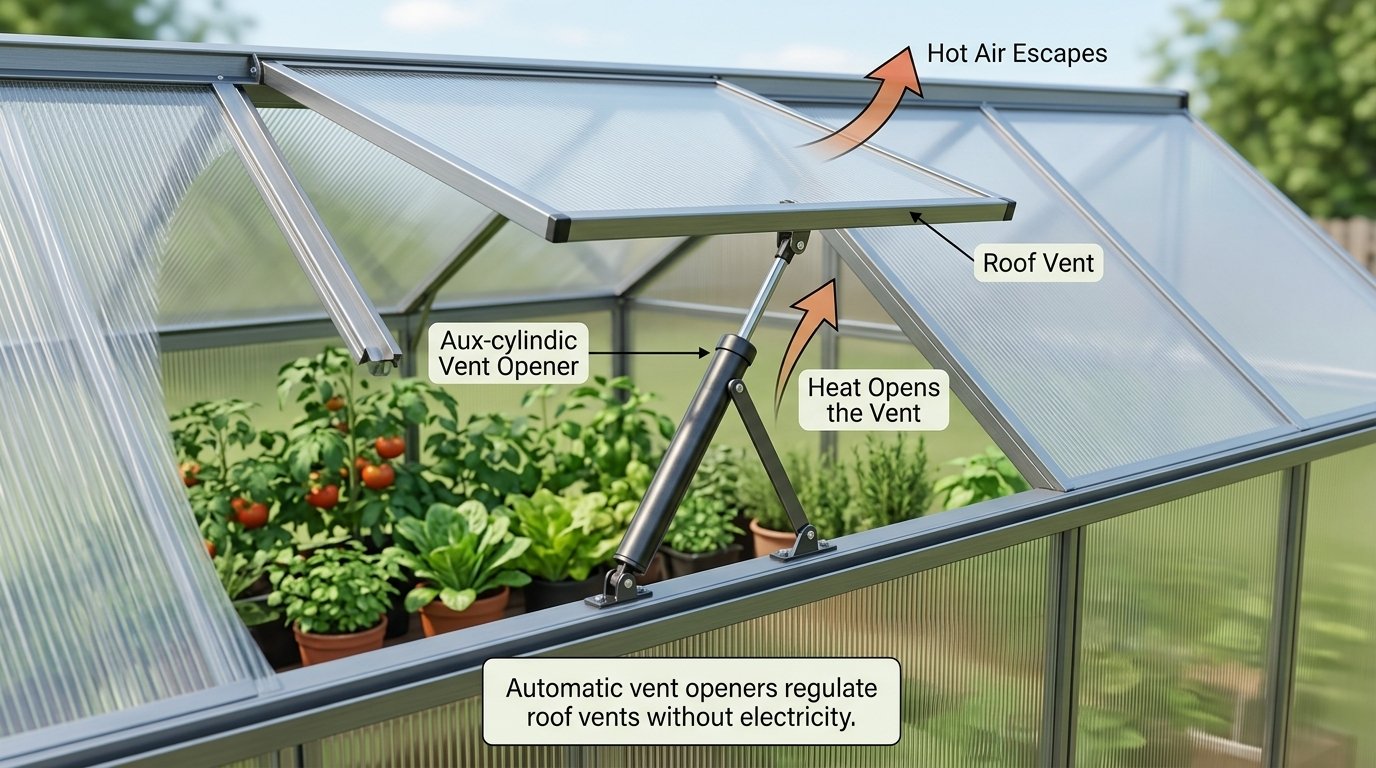
Full automated environmental controllers, which coordinate fans, vents, heating, and sometimes shading based on programmed thresholds, exist at a much more sophisticated (and more expensive) level, generally aimed at commercial or semi-commercial operations. For a typical home greenhouse, a thermostat-controlled fan and one or two automatic vent openers usually cover the practical need without that added complexity or cost.
A Note on Ventilation and Pest Screening
If you've also researched keeping pests out of your greenhouse, you may already be using or considering fine mesh screening on your vents. It's worth knowing upfront that screening does reduce airflow to some degree finer mesh, which blocks smaller pests, restricts more airflow than a coarser screen. This isn't a reason to skip screening, but it does mean that a greenhouse relying on fine mesh may need slightly more vent area or fan capacity than the general guidelines above to compensate, particularly in hot climates.
Frequently Asked Questions
Do greenhouses need ventilation?
without ventilation, a greenhouse can overheat by 20–30°Fabove outside temperature within an hour, and humidity builds up with nowhere to escape, creating ideal conditions for fungal disease. Ventilation is not optional it's one of the most essential parts of greenhouse management.
Why does my greenhouse get so hot even on a mild day?
Because the main driver of greenhouse heat isn't outdoor air temperature it's solar heat gain. Sunlight passes through the glazing, converts to heat when it strikes surfaces inside, and then has difficulty escaping back out through that same glazing. This can happen even on a cool, sunny day, which is why checking the forecast isn't enough on its own.
How many vents does my greenhouse need?
As a starting rule of thumb, aim for total vent coverage of at least 15–20% of your greenhouse's floor area, split between a low intake (a door or side vent) and a high outtake (a roof or ridge vent). A small 6-by-8-foot greenhouse, for example, would need roughly 7 to 10 square feet of total vent opening.
Do I need both shading and ventilation, or just one?
Usually both, working together rather than as alternatives. Shading reduces how much heat enters the greenhouse in the first place, while ventilation removes the heat that does build up. Relying on only one typically leaves a gap the other would have covered.
What size fan do I need for my greenhouse?
A reasonable starting point, based on University of Massachusetts Extension guidance, is fan capacity of roughly twice your greenhouse's floor area, measured in CFM. A 48-square-foot greenhouse, for instance, would need roughly 96 CFM of fan capacity as a baseline.
Will screening my greenhouse vents block pollinators or reduce airflow?
Fine mesh screening does reduce airflow somewhat and can also make it harder for pollinating insects to enter. If you rely on fine screening for pest control, consider slightly increasing your vent area or fan capacity to compensate, and be aware you may need to hand-pollinate certain crops as a result.
How do I keep my greenhouse warm in winter without cutting off airflow?
Focus on sealing drafts, adding insulation to less light-critical areas, and using thermal mass to hold heat overnight, while still allowing brief periods of airflow even a short midday vent opening on milder days to prevent humidity from building up and encouraging fungal disease.
Are automatic vent openers worth buying?
For most home greenhouses, yes. Wax-cylinder automatic vent openers require no electricity, open and close vents automatically as temperature changes, and are a relatively low-cost way to get more consistent ventilation than manual adjustment alone, especially if you can't check on your greenhouse throughout the day.
The Bottom Line on Greenhouse Ventilation and Temperature Control
Greenhouse ventilation and temperature control comes down to understanding one core fact your greenhouse heats up because of trapped solar energy, not just outdoor weather and then applying a few well-sized, complementary tools to manage it: enough vent area paired correctly between intake and outtake, shading to reduce the heat load in the first place, evaporative cooling as a low-cost supplement, and a genuine winter strategy that retains heat without sacrificing the airflow your plants still need.
Start by checking your current setup against the vent-coverage guidance above, and address the biggest gap first, whether that's an intake you're missing, shading you haven't added yet, or a winter draft you've been meaning to seal. Getting this system right is one of the most foundational things you can do for a healthy greenhouse, and it pays off in every season, not just the one currently giving you trouble.
If you haven't yet worked out your full greenhouse routine, our guide to greenhouse gardening tips covers the complete picture, including watering, soil, and what to grow first.